Anti-aliasing is a fundamental concept in digital image editing, particularly in Photoshop. This technique smooths out the jagged edges of graphics and text, resulting in a more polished and professional appearance. By blending the colours of pixels along the edges, anti-aliasing creates a smoother transition between contrasting colours. As a result, the image appears more visually pleasing and natural.
Understanding how anti-aliasing works and knowing when to apply it can greatly enhance the quality of your designs. In this article, we will explore the concept of anti-aliasing in Photoshop, its applications, and how it differs from other similar techniques. We will provide tips on how to effectively use anti-aliasing to achieve optimal results in your digital artwork.
Key Takeaways
- Anti-aliasing smooths jagged edges of images and text
- Disabling anti-aliasing can achieve a more precise and defined appearance
- Anti-aliasing settings can be adjusted for brushes and pencils
- Anti-aliasing reduces jagged edges and creates smoother lines
Understanding Anti-Aliasing
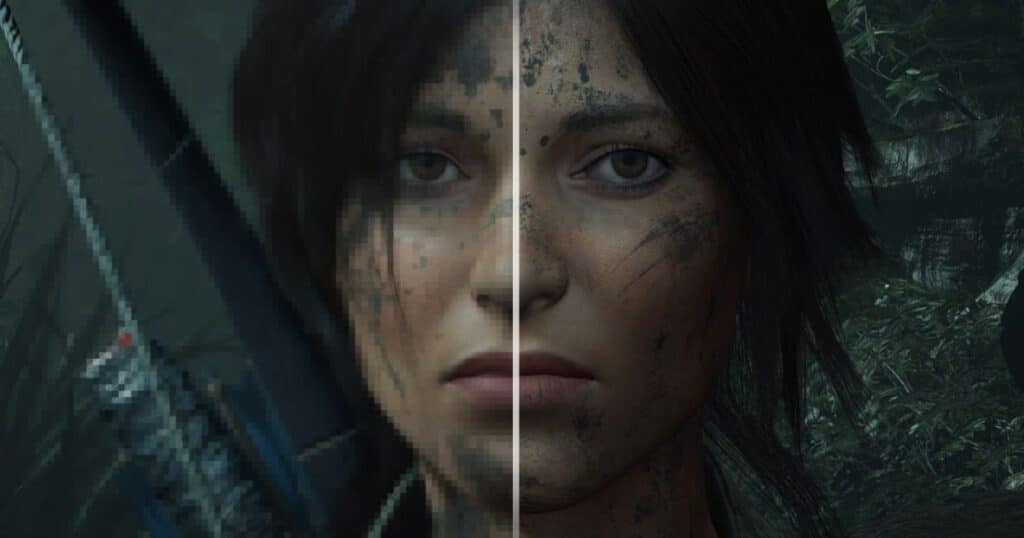
Anti-aliasing is a technique used in Photoshop to smooth the jagged edges of images and text, resulting in a more visually pleasing appearance. When an image or text is displayed on a screen or printed, it is made up of individual pixels, which can create a stair-step effect along the edges.
This can be particularly noticeable when dealing with diagonal or curved lines. To overcome this issue, anti-aliasing introduces intermediate colours along the edges, blending the pixels together and creating a smoother transition. By averaging the colours of the pixels adjacent to the edges, anti-aliasing creates a more realistic and natural appearance.
Disabling Anti-Aliasing in Photoshop
To disable anti-aliasing in Photoshop, adjust the settings to remove the smoothing effect applied to images and text. Anti-aliasing can be disabled globally in Photoshop by going to the Preferences menu, selecting General, and unchecking the Anti-aliased Artwork option. Anti-aliasing can be disabled for individual layers by selecting the layer and navigating to the Layer menu, then choosing Layer Style and unchecking the Anti-aliased option.
Disabling anti-aliasing can be useful when working with pixel art or when a sharp, crisp look is desired. By turning off anti-aliasing, you can achieve a more precise and defined appearance for your images and text Change Artboard Size in Photoshop. In the next section, we will explore how to enable anti-aliasing with brushes and pencils in Photoshop.
Anti-Aliasing with Brushes and Pencils
When using brushes and pencils in Photoshop, it is important to understand how anti-aliasing affects the appearance of your strokes. Anti-aliasing is a technique used to smooth out the jagged edges of lines and shapes.
When applied to brushes and pencils, it helps create smoother and more realistic strokes. Here are three key points to keep in mind when working with brushes and pencils in Photoshop:
- Brush and pencil settings: Adjusting the anti-aliasing settings for brushes and pencils can significantly impact the smoothness of your strokes. Experiment with different settings to achieve the desired effect.
- Brush hardness: The hardness of the brush can also affect the appearance of anti-aliasing. Softer brushes tend to produce smoother strokes, while harder brushes may result in more defined edges.
- Zoom level: Zooming in on your artwork can help you better visualize the impact of anti-aliasing on your strokes. It allows you to see the details and make necessary adjustments for a more polished result.
Anti-Aliasing Vs. Feathering
The distinction between anti-aliasing and feathering in Photoshop lies in their respective effects on the smoothness and blending of edges. Anti-aliasing is a technique used to reduce jagged edges and create smoother lines and curves. It works by blending the edge pixels with the background colour, resulting in a more seamless transition between the object and its surroundings.
On the other hand, feathering is a method used to create a gradual transition between a selection and its surrounding pixels. It softens the edges of a selection by applying a gradual fade, which can be adjusted to achieve different levels of feathering. While both techniques aim to improve the appearance of edges, anti-aliasing specifically targets jaggedness, while feathering focuses on creating a smooth transition between selected and non-selected areas.
Comparing Anti-Aliasing and Feathering
How do anti-aliasing and feathering compare in Photoshop? While both techniques are used to enhance the visual appearance of images, they serve different purposes and produce different effects.
Here are three key differences between anti-aliasing and feathering in Photoshop:
- Anti-aliasing smooths the jagged edges of an image by adding intermediate pixels of varying colour intensity. This technique is commonly used when resizing or rotating images to maintain their sharpness and clarity.
- Feathering, on the other hand, creates a gradual transition between the image and its background. It is often used for blending or fading images together, creating soft edges, or adding a vignette effect.
- Anti-aliasing is mainly applied to hard-edged objects, while feathering can be used on any part of an image.
Anti-Aliasing in Illustrator
Anti-aliasing in Illustrator is a technique used to smooth the jagged edges of graphics and maintain their visual clarity. When working with vector graphics in Illustrator, the default setting for anti-aliasing is usually turned on. This means that the jagged edges of lines and shapes are automatically smoothed out, resulting in a more polished and professional appearance.
Anti-aliasing achieves this by blending the edge pixels with the background colour, creating a smooth transition between the two. By doing so, it reduces the appearance of staircase-like jaggedness, also known as aliasing, which occurs when straight lines or curves are displayed with a limited number of pixels. This technique significantly improves the overall quality and visual aesthetics of illustrations and designs created in Illustrator.
Tips for Using Anti-Aliasing in Photoshop
To optimize the visual quality of graphics in Photoshop, including the keyword “What Is Anti- Aliased In Photoshop?, it is essential to employ effective techniques for utilizing anti-aliasing. Anti-aliasing helps to smooth the jagged edges of images and text, resulting in a more polished and professional look. Here are three tips for using anti-aliasing in Photoshop:
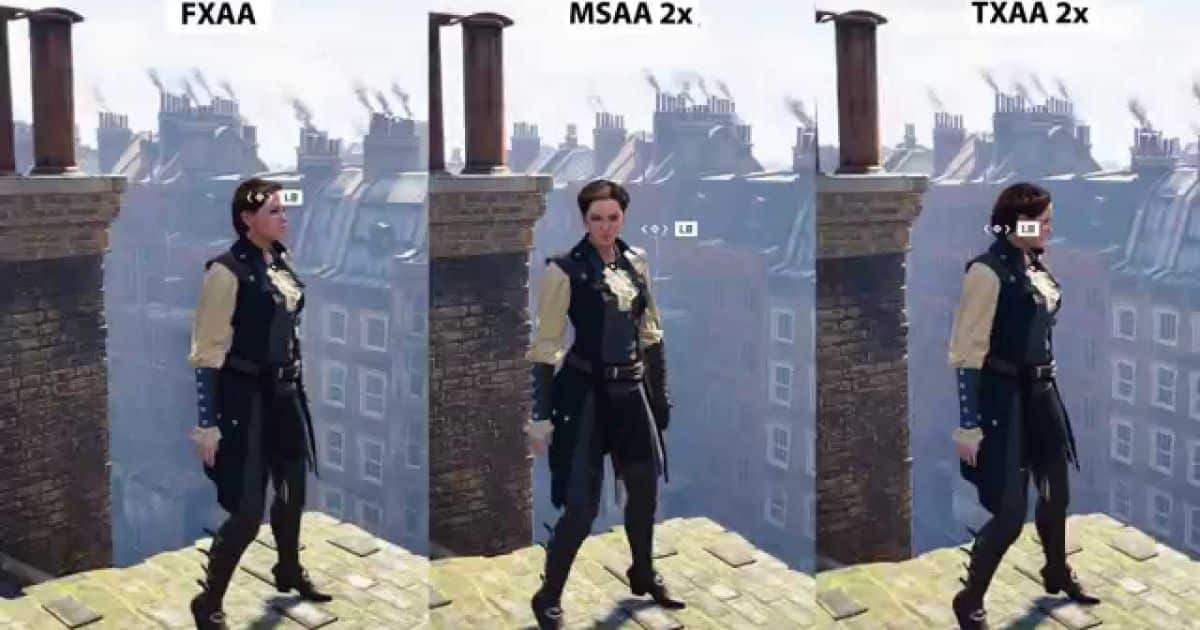
- Use the correct anti-aliasing method: Photoshop offers different anti-aliasing options, such as None, Sharp, Crisp, Strong, and Smooth. Choose the method that best suits your needs and the specific graphic you are working on.
- Adjust the anti-aliasing settings: You can fine-tune the anti-aliasing settings in Photoshop to achieve the desired level of smoothness. Experiment with different settings to find the perfect balance between sharpness and smoothness.
- Apply anti-aliasing to text and graphics: Anti-aliasing is especially important when working with small text or graphics with intricate details. Apply anti-aliasing to these elements to ensure they appear crisp and clear, even at smaller sizes.
FAQs
What does image anti-alias do?
Image anti-aliasing smoothens jagged edges in pictures, reducing pixelation for a cleaner appearance. It works by blending adjacent pixels’ colours, minimizing the stark transitions and creating a more visually appealing and realistic representation of the image.
What is aliased and anti-aliased?
Aliasing is a jagged or stair-stepped effect in computer graphics, while anti-aliasing smoothens these edges for a more polished appearance.
What is the anti-aliasing effect?
Anti-aliasing is a graphics technique that smoothens jagged edges in images, reducing pixelation. It enhances visual quality by blending contrasting pixels along the edges, creating a more polished and realistic appearance in digital graphics and text.
Conclusion
In conclusion, understanding anti-aliasing is important for creating smooth and high-quality images in Photoshop. By disabling anti-aliasing, you can achieve a more pixelated and crisp look. Anti-aliasing with brushes and pencils helps to blend edges and create a more realistic appearance.
It is important to note that anti-aliasing and feathering are two different techniques used for different purposes. Lastly, anti-aliasing is also available in Illustrator and can be used effectively with some tips and tricks.