Adobe Photoshop is a powerful tool widely used by professionals for graphic design and image editing. One of its essential features is the ability to manipulate and format text. In this guide, we will explore the process of underlining text in Photoshop. Underlining text is a fundamental formatting technique that adds emphasis and clarity to your designs.
Whether you are creating a logo, a poster, or a social media graphic, underlining text can help make your message stand out. In this introduction, we will provide you with a step-by-step guide, tips and tricks, and advanced techniques to create stylish underlined text in Photoshop. So let’s dive in and master the art of underlining text in Photoshop.
Key Takeaways
- Underlining text in Photoshop adds emphasis and clarity to designs.
- Underlining text can make messages stand out in logos, posters, and social media graphics.
- Underlining text improves emphasis on specific words or phrases.
- Underlining text enhances readability and provides a clear visual cue for the reader’s eye.
Introduction to Underlining Text in Photoshop
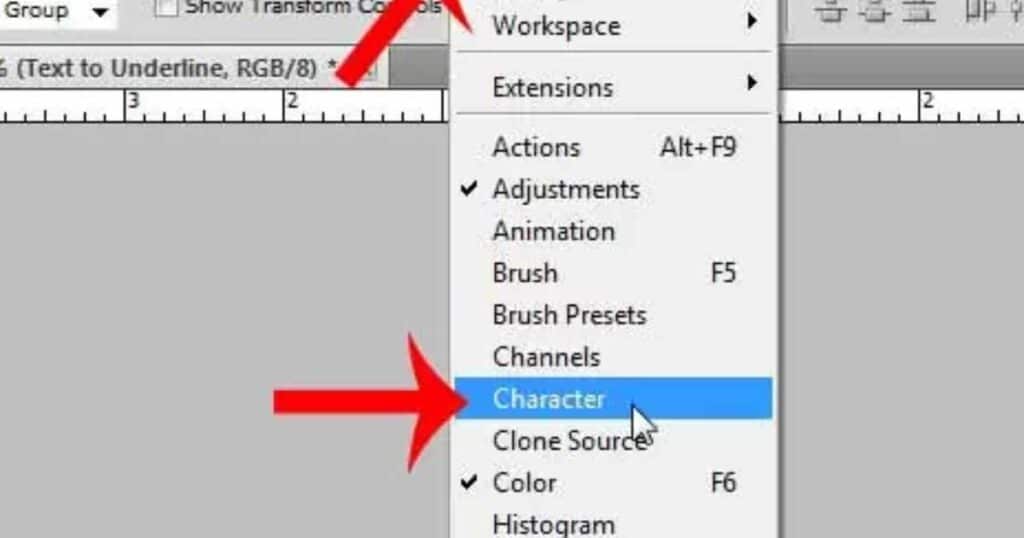
To begin, let’s explore the fundamental steps involved in underlining text in Photoshop. Underlining text in Photoshop is a simple yet powerful way to emphasize certain words or phrases in your designs. The first step is to open your desired document in Photoshop and select the Text tool from the toolbar. Next, click on the area where you want to add the text and start typing.
Once your text is entered, highlight the specific words or phrase that you want to underline. Then, go to the Character panel and look for the underline icon. Click on it to apply the underline effect to your selected text. With these easy-to-follow steps, you can quickly enhance the visual impact of your text in Remove Halftone Dots in Photoshop. Now, let’s move on to the next section to explore the benefits of underlining text in Photoshop.
Benefits of Underlining Text in Photoshop
Underlining text in Photoshop offers several advantages in enhancing the visual impact and readability of your designs. Here are three key benefits of underlining text in Photoshop:
- Improved emphasis: Underlining text allows you to add emphasis to specific words or phrases in your design. This can help draw attention to important information or make certain elements stand out.
- Enhanced readability: Underlining text can make it easier for readers to quickly scan and comprehend your content. It provides a clear visual cue that helps break up the text and guide the reader’s eye along the line.
- Design consistency: Underlining text can contribute to the overall aesthetic consistency of your design. By using underlines consistently throughout your project, you can create a cohesive and polished look.
Basic Tools and Features for Underlining Text in Photoshop
To achieve a professional and polished look in your designs, mastering the essential tools and features for adding underlines to text in Photoshop is crucial. Thankfully, Photoshop provides several options to customize and enhance the underlining effect. One of the basic tools you can use is the Type Tool, which allows you to create and edit text layers.
By selecting the text layer and clicking on the Underline option in the Character panel or control bar, you can easily add an underline to your text. Photoshop offers various options to adjust the underline’s color, thickness, and style. You can experiment with different blending modes, stroke settings, and even apply layer styles to further enhance the underlined text.
Step-by-Step Guide to Underlining Text in Photoshop
The first step in underlining text in Photoshop is to select the appropriate text layer. Once you have selected the layer, follow these steps:
- Double-click on the text layer in the Layers panel to open the Layer Style dialog box.
- In the Layer Style dialog box, click on the “Stroke” option.
- Adjust the settings for the stroke, such as size, color, and position, to create the desired underline effect.
Tips and Tricks for Creating Stylish Underlined Text in Photoshop

To enhance the visual appeal of underlined text in Photoshop, it is beneficial to incorporate various techniques and creative approaches. One tip is to experiment with different line weights for the underline. Thicker lines can convey a bold and impactful look, while thinner lines can create a more delicate and elegant effect. Consider using different colors for the underline to make it stand out more.
You can match the underline color to the text color for a cohesive look, or choose a contrasting color to make it pop. Another trick is to apply various layer styles to the underline, such as gradients, patterns, or textures, to add depth and visual interest. Lastly, don’t be afraid to play around with the placement of the underline. Instead of a traditional straight line, try curving or zig-zagging it for a unique and dynamic result.
Advanced Techniques for Customizing Underlined Text in Photoshop
Advanced techniques can be employed to customize underlined text in Photoshop, allowing for greater flexibility and creativity in design. Here are three advanced techniques that can be used to enhance underlined text in Photoshop:
- Gradient Underline: Instead of a solid color underline, apply a gradient fill to create a more dynamic and visually appealing effect. Experiment with different colors and opacity levels to achieve the desired result.
- Patterned Underline: Use Photoshop’s pattern fill feature to add texture and depth to the underline. Choose from a variety of patterns or create your own custom pattern to give the text a unique look.
- Decorative Underline: Incorporate decorative elements such as shapes or icons into the underline to add visual interest. Place these elements strategically along the underline to create a customized and stylish design.
Troubleshooting Common Issues With Underlining Text in Photoshop
One common issue that may arise when underlining text in Photoshop is the misalignment of the underline with the text. This can be frustrating, as it disrupts the overall appearance and professionalism of the design. To troubleshoot this issue, there are a few steps you can take.
Firstly, ensure that you have selected the correct font and size for your text. Sometimes, using a different font or adjusting the size can help align the underline correctly. Check the spacing between the letters. If the letters are too close together, it can cause the underline to appear misaligned. Adjusting the kerning or tracking can help resolve this issue.
Lastly, make sure that the underline layer is positioned correctly and aligned with the baseline of the text layer. By carefully considering these factors, you can troubleshoot and resolve misalignment issues when underlining text in Photoshop. If you’re wondering How to Underline Text in Photoshop? it’s essential to pay attention to these details for a polished and professional result.
Conclusion and Next Steps

In conclusion, mastering the technique of underlining text in Photoshop is essential for creating professional and visually appealing designs. Now that you have learned how to troubleshoot common issues with underlining text, it’s time to take the next steps in your Photoshop journey. Here are three actions you can take to further enhance your text design skills:
- Experiment with different fonts and sizes: Play around with various font styles and sizes to find the perfect combination that complements your design. Remember to consider readability and legibility when selecting your fonts.
- Explore additional text effects: Underlining is just one of many text effects you can achieve in Photoshop. Take the time to learn about other effects such as drop shadows, embossing, and gradient overlays. These effects can add depth and dimension to your designs.
- Practice and experiment: The more you practice, the more comfortable you will become with underlining text in Photoshop. Don’t be afraid to experiment and try out different techniques. The more you explore, the more creative and unique your designs will become.
FAQs
How do you underline letters in Photoshop?
To underline letters in Photoshop, select the text layer, go to the “Character” panel, and click the “Underline” button. Alternatively, you can press Ctrl + U (Cmd + U on Mac) to toggle the underline option.
What is the shortcut for underline in Photoshop?
In Photoshop, the shortcut for underline is Ctrl + U on Windows or Command + U on Mac. Simply press these keys to apply the underline effect to the selected text or layer.
How do you underline text?
To underline text, simply select the words you want to emphasize and click on the underline” icon in your word processing software or use the keyboard shortcut Ctrl+U (Command+U on Mac).
Conclusion
Underlining text in Photoshop is a simple yet powerful way to add emphasis and style to your designs. By following the step-by-step guide and using the basic tools and features, you can easily create professional-looking underlined text.
By exploring advanced techniques and troubleshooting common issues, you can further customize your underlined text to suit your unique creative vision. Get ready to take your designs to the next level with the art of underlining text in Photoshop!