Take your real estate photography from lacklustre listing shots to works of art with this all-encompassing guide covering equipment, lighting, composition, editing, staging, and more.
Exceptional real estate photography goes beyond just snapping basic listing shots—it’s about crafting enticing visuals that spotlight a home’s finest features. This comprehensive guide dives into the technical and creative skills needed to produce standout interior and exterior real estate photos. Learn pro tips for selecting optimal camera gear, harnessing natural light, composing captivating scenes, professionally staging rooms, and digitally enhancing images. Whether you’re just starting out in real estate photography or looking to refine your skills, this resource covers everything from key settings and equipment to advanced shooting and editing techniques. Master the art of showcasing properties through stunning visual storytelling.
Curating An Optimal Real Estate Photography Kit
Invest in fast wide angle primes like 16-35mm f/2.8 and tilt-shift lenses to prevent distortion in cramped spaces. Use off-camera flash with small portable softboxes for perfectly diffused interior lighting. Round out your kit with a sturdy tripod, remote triggers, neutral density and polarizing filters to balance bright exteriors.
Sculpting Light For Breathtaking Real Estate Photos
For exteriors, leverage the coveted “magic hour” right after sunrise or before sunset when light is abundantly soft and warm. For interiors, flip on all lighting plus lamps and sconces to avoid overly dark shadows. Strategically supplement available light with reflectors and flashes where needed to fill shadows and illuminate darker corners of rooms.
How To Make Your Real Estate Photos Dynamic
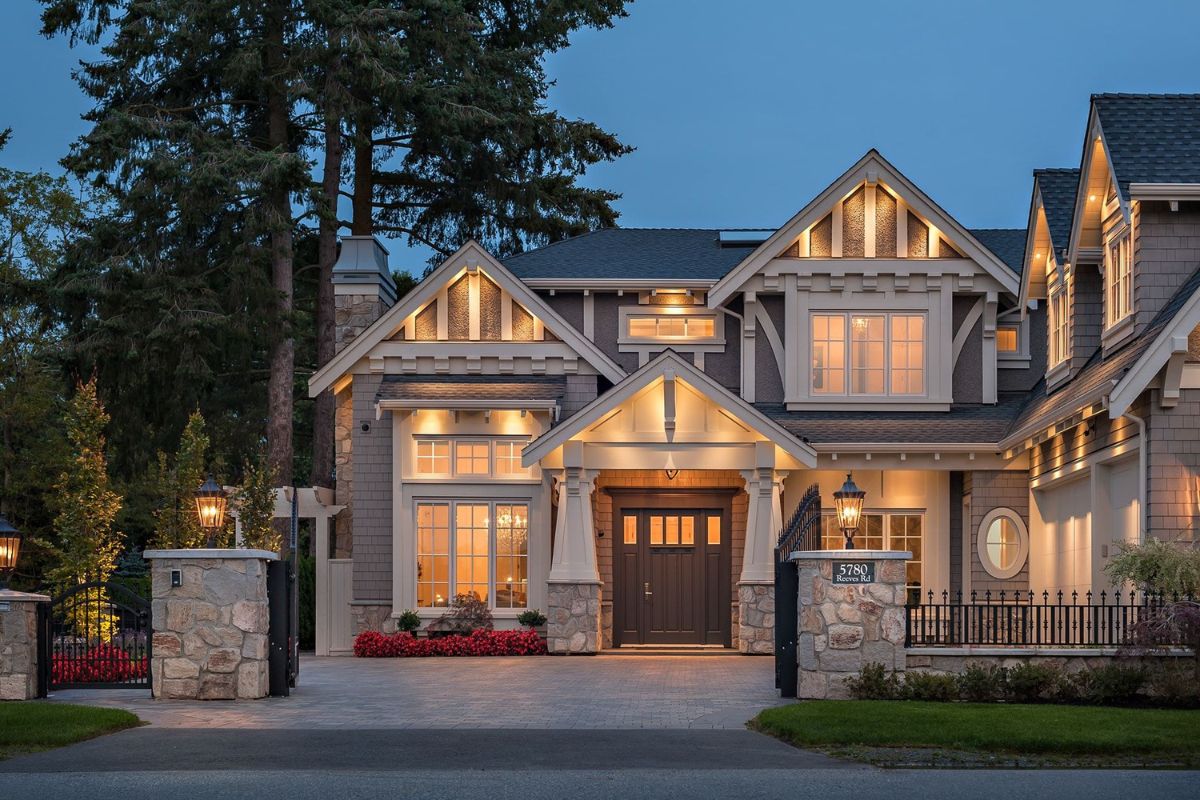
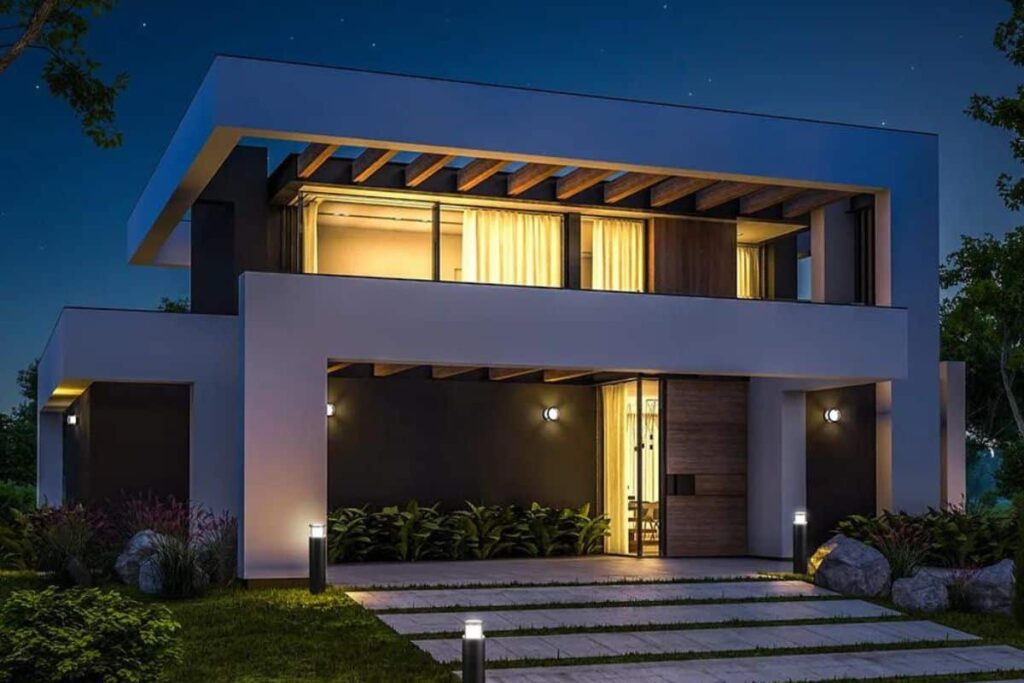
Whether you’re taking the photos yourself or selecting images your photographer sends you, make sure to include photos of the home in the daylight and at nighttime. Natural daylight showcases the home’s major features such as the exterior facade and how much natural light comes in through the windows. Night photography allows you to show off the home’s ambient lighting, creating a warm and cozy atmosphere.
Daytime photography:
- Natural light: Emphasize how large windows, skylights, and glass doors provide ample light. Soft, diffused natural light enhances textures, colors, and architectural details.
- Fill light: Use artificial lighting such as lamps or sconces to fill in harsh shadows and prevent overly bright or dark spots in a photo.
- Accent lighting: Accent lighting such as spotlights can be used selectively to draw attention to stylish fixtures such as recessed shelves or staged art.
Night photography:
Playing with lighting in your night photography is a great way to bring an element of storytelling into your listing. Night photography can make a home appear warm and cozy, romantic, dramatic, or play up any other moods you want to emphasize.
- Exterior lighting: Use outdoor lighting such as pathway lights, landscape lights, and uplights to illustrate the property’s appearance at night. Be sure to include well-lit nighttime photos of a pool or any water feature.
- Interior lighting: Use warm and dimmed lights to create an intimate and cozy atmosphere in areas such as living spaces, dining areas, and bedrooms.
Pro tip: Don’t forget to add a picture at twilight––the golden-hour lighting is flattering for houses, too.
Composing Captivating Interior Real Estate Photographs
Use the rule of thirds to artfully frame architectural elements and rooms off-center for dynamism. Shoot from corners to add depth and perspective. Get low and shoot upwards to emphasize soaring ceilings. In tight spaces, compose vertically to maximize use of vertical frame space. Play with symmetry and patterns for added visual interest.
What You Need To Take Luxury Real Estate Photos Yourself
Like lighting, staging is an area where you can do some creative storytelling to capture potential buyers’ attention. You know your target audience––now speak to them by showcasing the property in a way that resonates with them and makes them feel at home.
Depending on your level of design experience, it might be a good idea to collaborate with interior designers or professional stagers. Interior designers and professional stagers offer knowledge, experience, and an objective perspective on the staging process. They also bring expertise in design principles, furniture selection, and market trends to ensure that the property is presented in the best possible way.
Professional-level staging can:
- Enhance a property’s potential: Buyers can envision the space’s potential and imagine how they would decorate it themselves.
- Create an emotional connection: Potential buyers can visualize their day-to-day lives in the property.
- Highlight key features: Strategically positioned furniture and tasteful decoration can create a much more three-dimensional image, demonstrating the size and scale of rooms, staircases, and windows.
- Create consistency and cohesion: A careful selection of furniture, artwork, and accessories provides a seamless visual experience for potential buyers. The rooms need to appear distinct from one another, but should not feel disjointed.
- Broaden the market appeal: Professional staging makes a property appealing to a broad range of buyers by avoiding anything too trendy or niche.
Mastering Challenging Vertical And Horizontal Lines
Enable lens profile corrections in-camera and post to eliminate convergence and distortion of verticals. Use shift movements on tilt-shift lenses to keep walls and structures perfectly parallel. Pay close attention to ensure horizontal lines appear precisely level in every exposure. Retouch in post if needed to straighten skewed lines.
Optimizing Exposure Settings For Real Estate Photos
In bright rooms, use Manual mode at ISO 100, f/8, and shutter speed around 125th sec. In dim rooms, bump ISO to 400-800 and open aperture to f/4 or wider. Expose for the highlights to preserve detail in brightest areas. Bracket exposures to rescue overly bright or dark regions later through HDR and editing.
Crafting Dimensional, Flattering Light In Any Space
Bounce flash off ceilings and walls for ultra soft, even lighting. Position off-camera flashes low and near the lens axis to minimize shadows. Add accent lighting behind or above architectural details to highlight desirable features. In expensive luxury homes, use portable studio strobes with large modifiers for gorgeous light.
Design Principles For Jaw-Dropping Real Estate Photographs
Lead the viewer’s eye through frames using lines like hallways or fences. Frame focal points using the rule of thirds for dynamism. Allow empty space around subjects for the eye to rest. Play with symmetry and patterns for added visual interest. Use wide perspectives to convey the grandeur of spaces and rooms.
Shooting Stunning High-End Real Estate Imagery
Use wide angle lenses like 16-35mm to portray scale and grandeur. Employ multiple off-camera strobes with large softboxes and modifiers for dimension. Photograph during optimal ambient light hours wherever possible. Scout locations ahead of shoots to maximize creativity. Collaborate with agents on priorities.
Capturing Eye-Catching Daytime Real Estate Photographs

For exteriors, leverage long exposures on a tripod to smooth skies and water. For interiors, shoot when the sun is at its peak to harness ample natural light. Lower exposure compensation significantly when shooting outdoors to prevent blowing out highlights. Use HDR merging to master high contrast daytime scenarios.
Shooting Dramatic Dusk, Twilight And Nightscapes
Photograph at dusk with long shutter speeds for silky, vividly colored skies. For true nightscapes, use ultra high ISO and wide apertures to capture starry skies. Light and composite multiple exposures to balance dark foregrounds. For night interiors, paint rooms using portable strobes and slow shutter speeds.
Mastering Perspective And Framing In Real Estate Photography
Shoot from corners to add intrigue and depth. Frame verticals parallel to the sensor to minimize distortion. Get ultra wide or high perspectives for added drama. Lead the eye strategically through your frames. Use empty space, symmetry and layers intentionally. Avoid skewed verticals and horizontals.
Incorporating The Golden Ratio And Rule Of Thirds
Place subjects off-center at intersections of gridlines or along the golden spiral for optimal compositions. Avoid horizons cutting frames in half. Use ratios to give breathing room around focal points. Lead the eye masterfully into shots.
Using Leading Lines For Compositional Dynamism
Strategically compose leading lines utilizing floors, walls, fences, sidewalks, etc to energetically guide the viewer through images. Curving lines add elegance. Strong diagonals convey vitality. Place subjects at the terminus of leading lines for emphasis.
Pro Tips For Framing Captivating Real Estate Photographs
Thoughtfully frame architectural details like entryways, archways or hallways. Lead the eye into shots intentionally using lines, empty space, and foreground elements. Shoot through doorways or windows for added layers, depth and perspective. Frame subjects within the surrounding environment context.
Bonus Tips
In all rooms, remember to:
- Use a tripod to ensure steady and precise shots.
- Take shots from multiple angles and select the best ones.
- Use natural light as much as possible.
- Pay attention to the details; everything should be in its place, clean, and staged tastefully.
- Enhance photos in post-processing, but avoid over-editing.
Staging Luxury Real Estate Listings Like The Pros

Declutter interiors completely. Style rooms with elegant, minimal decor. Use professional staging props if needed. Depersonalize by removing personal photos and belongings. Make beds, style pillows, and create sophisticated vignettes. Add lush greenery. Maximize gorgeous natural light.
Shooting Each Room Creatively And Strategically
Here you’re presenting the individual pieces that come together to create the whole image. This is your chance to let each room speak for itself by asking yourself: what do people want to do in this space? Relax, host guests, or cook a family meal? Let your room-by-room photos be answers to those questions.
Exteriors
Use wide lenses to amplify scale. Shoot in optimal morning and evening light. Style driveways, entries, and landscapes minimally. Clean up yards.
Living Rooms
Bounce flash for soft, even lighting. Arrange furniture symmetrically with clear lines of sight. Declutter excessively. Showcase fireplaces.
Kitchens
Shoot overhead to emphasize countertops. Style counters minimally with fruit or plants. Use shallow depth of field for artistic background bokeh. Add accent lighting over surfaces.
Bedrooms and Baths
Make beds with hotel-style crisply tucked sheets. Style nightstands symmetrically. Widen doorways by propping open doors. Diffuse window light.
Outdoor Living Spaces
Photograph at dawn or dusk for vibrant skies. Style outdoor areas minimally. Use leading lines through landscaping. Light water features and pools.
Home office
- Include detailed photos of any built-in custom shelving or desk spaces.
- Arrange the office neatly and ensure any cables or equipment are hidden.
- Capture the view from the office window if it is impressive.
Unique Features
- Focus on what makes the property stand out, such as a home theater or wine cellar.
- Sometimes unique features aren’t fixtures. For instance, a stunning cityscape view from the back patio is unique and certainly worth including.
- When appropriate, use both close-ups and wide shots to give different perspectives.
Post Processing For Greater Visual Impact
Correct colors, amplify contrast, and enhance lighting digitally. Remove distortions and align vertical/horizontal lines. Replace skies if desired. Dodge & burn to balance exposure. Sharpen important details. Add optional drama through tone mapping.
Must-Have Tools For Efficient Real Estate Photo Editing
For efficiency, leverage presets and batch editing capabilities. Optimize raw files before global adjustments. Use Lightroom for organization and Photoshop for detailed editing. Rely on plugins like Topaz DeNoise AI for exceptional noise reduction. Save and apply your go-to actions to ensure consistent processing.
Software And Editing Tools
There are many options for software and editing tools. Here are some of the best tools for editing real estate photos:
- Adobe Lightroom: Loved by professionals for its ease of use and advanced features such as color correction, light adjustments, and batch processing.
- Adobe Photoshop: Great for complex edits, such as removing objects, blending exposures, and advanced retouching.
- Photomatix Pro: Creates HDR images, ideal for real estate photography to balance lighting.
- DxO PhotoLab: Provides high-quality denoising and optical corrections and is very user-friendly.
- Luminar AI: Automates editing tasks such as sky replacements, details enhancement, and light adjustments.
- PTGui: Stitches together panoramic images for virtual tours and 360-degree views.
- Canva: Handy for creating collages, adding text overlays, or designing social media posts.
- PicMonkey: Great for quick edits and offers many template designs.
- Skylum AirMagic: Designed for drone photographers, Skylum AirMagic makes it easier to edit aerial photographs.
Learning to use post-production tools requires practice and experimentation. Be patient as you explore the capabilities of these programs.
Avoiding Common Real Estate Photography Pitfalls
Be vigilant to prevent overexposed highlights, blurry shots, distorted verticals/horizontals, cluttered frames, blown out windows, empty boring rooms, lens flares, inaccurate white balance, shadows on faces, and unwanted color casts.
Selecting The Ideal Real Estate Photographer
Seek technical mastery in lighting, composition, and editing tailored to properties. Expect great communication, quick turnaround, and reasonably priced packages. Confirm they capture wide plus exterior to interior sequences showcasing entire homes. Review sample work matches your
Conclusion
Crafting stunning real estate imagery requires a meticulously curated photography kit and a nuanced understanding of lighting, composition, and post-processing techniques. Investing in versatile lenses, utilizing strategic lighting setups, and adhering to design principles such as the rule of thirds and leading lines are key. Whether capturing daytime splendor, twilight drama, or luxury interiors, attention to detail in every room is crucial. Post-processing enhancements, efficient editing tools, and a keen eye for avoiding common pitfalls round out the arsenal of a proficient real estate photographer. Ultimately, selecting the ideal photographer ensures a seamless blend of technical expertise, artistic finesse, and a commitment to showcasing properties at their very best.